Ever wonder how Slack instantly notifies you of a GitHub commit, or how your accounting software immediately knows about a Stripe payment? Often, the answer is webhooks. So, what is a webhook? It’s essentially an automated way for different web applications to talk to each other in real-time, triggered by specific events. This guide dives into how webhooks work, why they’re often better than traditional methods like API polling, common examples, and crucial security considerations.
What is a Webhook?
A webhook is a mechanism that allows one web application to send automated, real-time information to another application when a specific event occurs. Think of it as an HTTP callback: the source application makes an HTTP request (usually a POST) to a unique URL provided by the destination application.
This “push” model is often called a “reverse API.” Instead of the destination application constantly asking the source for updates (like a traditional API call often does via polling), the source application proactively sends the update information immediately after the event happens, making communication much more efficient.
Understanding Webhooks: The Doorbell Analogy
A simple analogy helps illustrate the core difference between webhooks and older methods like API polling. Imagine you’re waiting for a package delivery.
API Polling is like constantly opening your door every five minutes to check if the delivery truck is there. It’s repetitive, requires continuous effort on your part, and you might miss the exact moment the truck arrives between checks. Most checks yield no result (“no package yet”).
A Webhook is like having a doorbell. You give the delivery service your address (the webhook URL). When the package arrives (the event), the delivery person rings the doorbell (the source application sends the HTTP POST request). You are notified instantly and only when there’s actually something to report.
This highlights the efficiency and real-time nature of webhooks – they notify you when something happens, eliminating the need for constant, often fruitless, checking required by polling.
How Webhooks Work: A Step-by-Step Look
Understanding the technical flow demystifies how webhooks achieve this real-time communication. It involves a pre-configured setup allowing an automated interaction between two systems triggered by a specific event. Here’s the typical sequence:
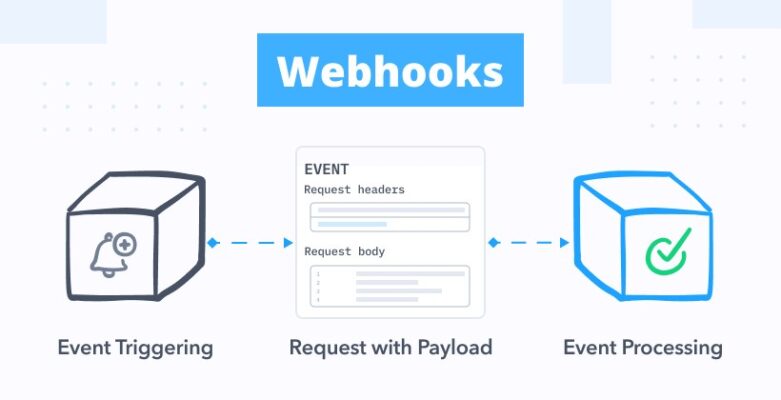
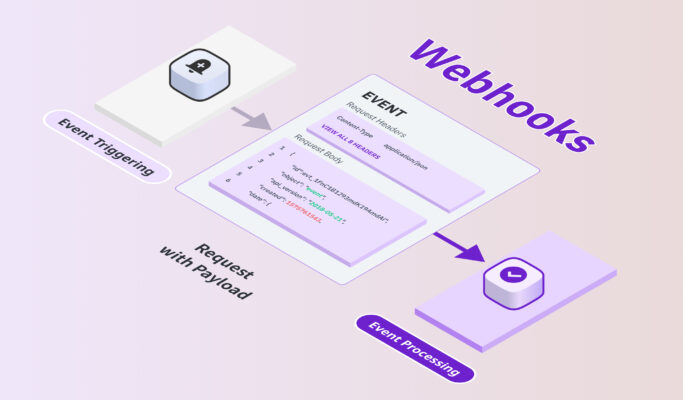
1. Configuration (Setting the URL & Events)
First, the user or developer configures the source application (the one where events happen, like GitHub or Stripe). This involves providing a specific Webhook URL obtained from the destination application (the one that needs to receive the data, like Slack or your custom server). You also select which specific event(s) should trigger the webhook (e.g., repo:push, payment:succeeded).
2. Event Trigger (Something Happens)
Next, the defined event occurs within the source application. This could be anything the application is designed to monitor: a user pushing code, a customer completing a purchase, a new user signing up, a sensor reading crossing a threshold, etc.
3. HTTP POST Request (Sending the Notification)
Immediately after the event occurs, the source application automatically compiles relevant data about that event into a structured message (the payload). It then sends this data via an HTTP POST request to the pre-configured Webhook URL that belongs to the destination application.
4. The Payload (Delivering the Data – JSON)
The body of the HTTP POST request contains the payload. This is the actual information about the event. While formats like XML or form-data can sometimes be used, the payload is most commonly structured using JSON (JavaScript Object Notation) due to its lightweight nature and ease of parsing by web applications.
5. The Endpoint Listener (Receiving the Data)
The destination application must have a web server or serverless function actively listening at the provided Webhook URL (the endpoint). This listener is specifically designed to receive incoming HTTP POST requests containing webhook payloads from the source application.
6. Taking Action (Processing the Payload)
Once the listener receives the HTTP POST request, it parses the JSON payload to extract the event details. Based on this data, the destination application performs a predetermined action – updating a database, sending a message to a chat room, triggering another workflow, logging the event, etc.
It’s best practice for the listener to respond quickly to the source application with an HTTP success status code (like 200 OK) to acknowledge receipt. Any time-consuming processing based on the payload should ideally happen asynchronously after sending this acknowledgement to avoid timeouts.
Key Components of a Webhook System
Several key elements work together to make webhook communication possible:
The Trigger Event
This is the specific action or occurrence within the source application that initiates the webhook process. Examples include a new sale, a code commit, a form submission, a database update, or a specific API call completion. Defining which events trigger a webhook is part of the initial setup.
The Webhook URL (Endpoint)
This is the unique, publicly accessible URL provided by the destination application where it will listen for incoming webhook requests from the source application. It acts as the designated “address” for receiving event notifications. Each endpoint is typically designed to handle specific types of incoming webhooks.
The HTTP POST Request Method
This is the standard HTTP method almost universally used by source applications to send webhook data. POST is appropriate because the source is sending (posting) new event data to the destination URL for processing, often creating a new resource or triggering an action based on the event.
The Payload (Data Format – JSON)
The payload is the core data transmitted within the body of the HTTP POST request. It contains detailed information about the trigger event. JSON is the de facto standard format due to its readability and ease of parsing by virtually all web programming languages and platforms. The exact structure of the payload is defined by the source application sending the webhook.
Webhooks vs. API Polling: What’s the Difference?
Understanding the distinction between webhooks and the older method of API polling is crucial for appreciating the value webhooks bring to modern application integration and real-time systems. They represent fundamentally different approaches to inter-application communication.
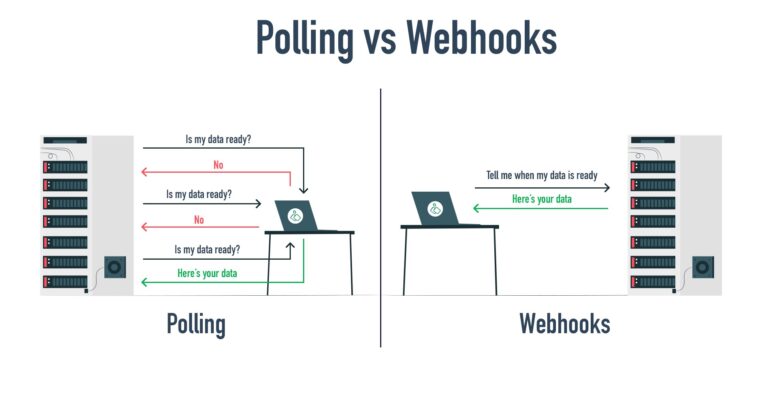
Communication Flow (Push vs. Pull)
- Webhooks (Push): The source application pushes data to the destination endpoint automatically when an event occurs. The destination is passive until notified.
- API Polling (Pull): The destination application must actively pull data by repeatedly sending requests to the source application’s API endpoint, asking if any new data is available.
Real-Time Capability
- Webhooks: Provide near real-time updates because the notification is sent immediately after the event happens.
- API Polling: Updates are inherently delayed, depending on the polling frequency. If polling happens every 5 minutes, the receiving application might only learn about an event up to 5 minutes after it occurred. Achieving near real-time with polling requires very frequent requests.
Resource Efficiency
- Webhooks: Highly efficient. Requests are only sent when there’s actual data to share. This minimizes unnecessary network traffic and server load on both the source and destination systems.
- API Polling: Often inefficient. Many polling requests return no new data, consuming bandwidth and server resources on both ends just to check for updates. Frequent polling to reduce latency significantly increases this resource consumption.
When to Use Which
- Use Webhooks when: You need immediate notifications about events happening in another system (real-time updates are critical). Efficiency is important, and you want to avoid unnecessary API calls. The source system supports sending webhooks for the events you care about.
- Use API Polling when: Real-time updates are not essential. You need to check for state changes at regular intervals regardless of specific events. The source system doesn’t offer webhooks for the required data, or the event frequency is extremely high, potentially overwhelming a webhook listener.
Common Webhook Use Cases and Examples
Webhooks are the backbone of countless integrations and automations across the web, connecting diverse platforms and enabling seamless workflows. Here are some concrete examples:
Code Repositories
When code is pushed to a repository on GitHub or GitLab, a webhook can trigger a Continuous Integration/Continuous Deployment (CI/CD) server (like Jenkins or GitHub Actions) to automatically build, test, and deploy the application. Another webhook might send a notification message to a Slack or Discord channel informing the team about the new code push.
Payment Gateways
When a customer makes a successful payment via Stripe or PayPal, a webhook immediately notifies the merchant’s backend system. This can automatically trigger actions like updating the order status in the database, sending data to accounting software (like QuickBooks), initiating the order fulfillment process in a warehouse management system, or sending a confirmation email.
E-commerce Platforms
A new order placed on a Shopify or WooCommerce store can trigger webhooks that send order details to a third-party shipping provider (like ShipStation) to generate labels, notify an inventory management system to update stock levels, or add the customer’s details to an email marketing platform (like Mailchimp).
CMS & Content Updates
When a new blog post is published or updated in a Content Management System (CMS) like WordPress, a webhook can notify search engines to re-index the content faster, automatically share the post link on social media platforms via tools like Buffer or Zapier, or trigger cache invalidation processes.
Communication Platforms
Incoming webhooks allow external applications to post messages directly into Slack or Discord channels. Outgoing webhooks (or interactive components often built on similar principles) allow bots within these platforms to react to user commands or messages by sending data to external services for processing.
Automation Tools
Platforms like Zapier and Make (formerly Integromat) heavily rely on webhooks. They provide users with unique webhook URLs that can act as triggers for automation workflows. When another application (even one not natively supported by Zapier/Make) sends data to this URL, it kicks off a sequence of actions connecting various other apps.
IoT Devices
Internet of Things (IoT) devices, like environmental sensors or smart home gadgets, can use webhooks to push data or alerts to a central server or a real-time dashboard immediately when a specific event occurs (e.g., temperature exceeds a threshold, motion is detected). This avoids the device needing to constantly poll a central server.
Setting Up a Webhook: The Basic Concept
While the exact interface varies between platforms sending and receiving webhooks, the fundamental setup process follows a general pattern:
Getting the Webhook URL from the Listener
First, you need the unique URL where the destination application will listen for incoming webhook requests. This might involve writing a small server-side script or serverless function that exposes an HTTP endpoint, or copying a pre-generated URL from a service like Zapier, Slack, or a custom application’s integration settings.
Configuring the Sending Application
Next, navigate to the settings area of the source application (the one where the events originate, like GitHub, Stripe, Shopify). Look for a section titled “Webhooks,” “API,” or “Integrations.” Here, you’ll typically add a new webhook configuration.
You will need to paste the Webhook URL obtained in the previous step into the appropriate field. You must also select the specific event(s) you want this webhook to be triggered by (e.g., push, order.created, payment_intent.succeeded). The application might also ask you to choose a payload format (usually JSON).
Implementing the Listener Logic
On the destination side (at the Webhook URL), you need code or a service capable of:
- Receiving incoming HTTP POST requests.
- Parsing the request body (the payload, usually JSON).
- (Crucially) Performing security verification (see next section).
- Executing the desired action based on the payload data.
- Responding promptly with an HTTP success status (e.g., 200 OK).
Testing Your Webhook
Testing is essential. Many source applications offer a “Send Test Webhook” feature. For developing listeners locally, tools like ngrok are invaluable. Ngrok creates a secure tunnel from the public internet to your local machine, giving you a temporary public URL you can use as your Webhook URL during development and testing, allowing you to inspect incoming requests.
Securing Your Webhooks: Essential Best Practices
Because webhook endpoints are URLs exposed to the internet, securing them is absolutely critical to prevent malicious actors from sending fake data, discovering sensitive information, or disrupting your services. Implementing robust security is non-negotiable.
Always Use HTTPS
Your webhook endpoint URL must use HTTPS (HTTP Secure). This ensures that the payload data transmitted between the source and destination applications is encrypted using TLS/SSL, preventing eavesdropping or interception of potentially sensitive information while it’s in transit over the network.
Verify the Sender
It’s vital to verify that incoming requests actually originated from the expected source application and haven’t been tampered with. The most common and recommended method is HMAC (Hash-based Message Authentication Code) signature verification.
Here’s how HMAC works conceptually:
- You share a secret key only between your application (listener) and the source application (sender).
- When sending a webhook, the source app calculates a signature by hashing the request payload using the secret key.
- This signature is included in a request header (e.g.,
X-Hub-Signature-256,Stripe-Signature). - Your listener receives the request, takes the payload and the shared secret key, and independently calculates the expected signature using the same hashing algorithm.
- Your listener compares its calculated signature with the signature received in the header. If they match, the request is authentic and its integrity is verified. If not, reject the request. Platforms like GitHub, Stripe, Shopify, and many others use this method.
Other Verification Methods (Tokens, Basic Auth)
Simpler alternatives exist but are generally less secure than HMAC:
- Secret Tokens: Including a static, hard-to-guess secret token in the URL (as a query parameter) or a custom header. Your listener just checks for the presence and correctness of this token. Easier to implement but vulnerable if the token leaks.
- HTTP Basic Authentication: Requiring a username and password via standard HTTP Basic Auth headers.
Prevent Replay Attacks (Using Timestamps)
Malicious actors might try to intercept a valid webhook request and re-send it later (a replay attack). To mitigate this, webhook payloads should ideally include a timestamp. Your listener should check this timestamp and reject requests that are significantly older than the current time, allowing for a small tolerance for clock skew and network latency.
Validate the Incoming Payload Data
Even if a request is verified, always treat the incoming payload data as potentially untrusted input. Validate its structure (does it match the expected schema?) and content (are values within expected ranges or formats?) before using it in your application logic. This helps prevent injection attacks or processing errors caused by malformed data.
Protect Against SSRF (Server-Side Request Forgery)
If your webhook listener needs to make further network requests based on data within the payload (e.g., fetching an image from a URL provided in the payload), be extremely careful. Sanitize and validate any URLs or external resource identifiers provided in the payload to prevent Server-Side Request Forgery (SSRF) attacks, where an attacker tricks your server into making unintended requests to internal or external systems.
Why Use Webhooks? Key Benefits Summarized
Webhooks offer several significant advantages, making them a cornerstone of modern web development and integration:
- Real-time Updates: They provide immediate notifications as events happen, crucial for time-sensitive operations.
- Improved Efficiency: They drastically reduce server load and network traffic compared to continuous API polling. Resources are used only when necessary.
- Automation Capabilities: They enable seamless, automated workflows between disparate systems without manual intervention or complex polling logic.
- Decoupled Architecture: They allow applications to react to events in other systems without needing tight coupling or direct dependencies, promoting more modular and resilient architectures.
Webhooks are a fundamental mechanism for enabling efficient, real-time, event-driven communication between modern web applications and services. By acting as automated HTTP callbacks that push data from a source to a destination upon specific events, they power countless integrations and automation workflows, offering significant advantages over traditional API polling methods.
While conceptually simple, implementing and consuming webhooks requires careful attention to detail, particularly regarding security best practices like HTTPS usage and signature verification, as well as ensuring endpoint reliability. Mastering webhooks is increasingly essential for developers and integrators building connected, responsive, and automated systems in today’s interconnected digital landscape.
Frequently Asked Questions (FAQ) about Webhooks
Here are answers to some common questions about webhooks:
Is a webhook just an API?
No, a webhook isn’t an API itself, but they are closely related and often work together. An API (Application Programming Interface) is a broader set of rules and definitions allowing applications to communicate. A webhook is a specific pattern of communication, often considered a “reverse API” or HTTP callback, where the server pushes data based on an event, rather than the client pulling data via standard API calls. An application typically needs an API to offer webhook functionality.
How do I get or create a webhook URL?
The webhook URL is provided or generated by the receiving application or service – the one that needs to listen for incoming event data. If you are building the listener yourself (e.g., a custom script or serverless function), you define the URL endpoint. If you are using a third-party service (like Zapier or Slack’s incoming webhooks), that service will provide you with the unique URL to use.
Are webhooks reliable?
Webhook reliability depends on both the sender and the receiver. Reputable sending platforms (like Stripe, GitHub) usually have robust retry mechanisms if the initial delivery to the endpoint fails (e.g., the receiving server is temporarily down). However, the receiving endpoint must be reliably available and designed to handle incoming requests quickly and efficiently (often acknowledging receipt first with a 200 OK and processing asynchronously). For critical workflows, solely relying on webhooks without supplemental checks might be risky.
Can webhooks send data back (two-way)?
Generally, no. Webhooks are designed as a one-way notification mechanism – the source pushes data to the destination. The typical response from the destination endpoint is just a simple acknowledgement (like 200 OK). If two-way communication or data retrieval is needed after the initial notification, the receiving application would typically make a separate, standard API call back to the source application or another relevant service.